
Brick Installation: How to Choose the Best Tile Pattern Layout
- Sep 7, 2022
- 4 min read
Updated: May 6, 2025
Choosing the right tile for your project is only the start of your design decision-making. Once you’ve chosen the optimal thin brick product for your project, you’ll have several other factors to consider before you’re ready for installation.
Alongside the type of mortar or adhesive you use, you’ll need to choose which grout color and type is right for your project. Finally, when you have all the necessary materials to begin installation, you‘ll need to decide what installation layout is best for your space and which aesthetic appeals to you most.

It’s important to also understand the differences between various brick tile options; for example, you can explore the distinctions between handmade thin brick tiles and cut brick in our comparison here.
This article will address several layout options to help aid your decision-making process.
Running Bond or Subway Tile or Offset

The running bond or subway tile is the most common installation pattern for brick and other ceramic tiles varieties. In this pattern, each row of tiles is typically offset by half a width (1/4 or 1/3 off sets are also a popular option).
To install, do one row at a time, butting the bricks end to end. On the next row, cut one brick in half for the end pieces and install so that the bricks run exactly centered to the previous row. Repeat these first two row patterns again and again until your installation is complete. Pros to consider for this install pattern:
1. Requires minimal cutting and measurement
2. Easy pattern to install
3. One of the sturdiest patterns
4. Easily follows a gentle curve.
Alternative - Diagonal Running Bond

Turning the running bond or subway tile to a 45-degree angle gives a less standard application than the original and works well over curved and uneven spaces.
Cons: Every brick that reaches the end will require custom cutting. You will need to order a little extra to account for the cuts.
Another Alternative: Vertical Running Bond
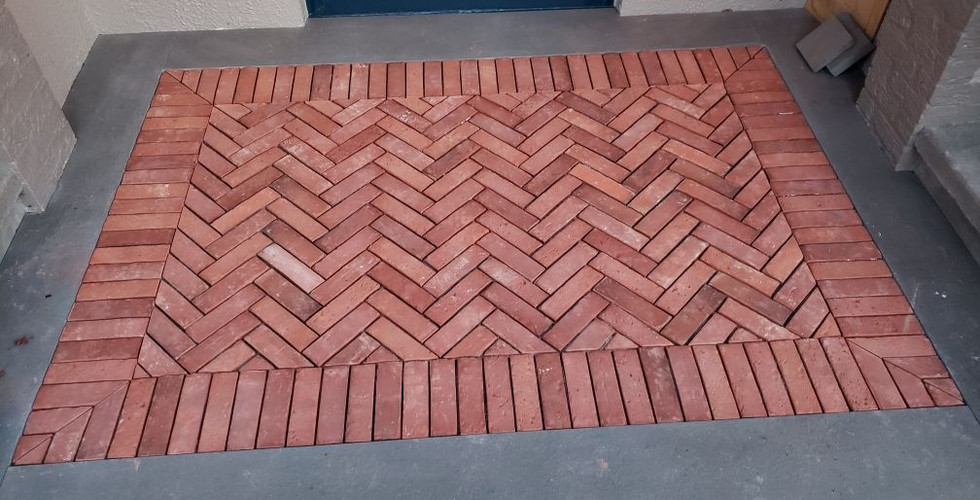
Herringbone

The zig-zag pattern creates an elegant look that looks exceptional on floors or accent walls and great with our Snohomish color mix or whitewashed brick.
This one is perfect for a DIY brick veneer siding project.
Pros: Gives more formal character to your brick project. Can be adapted to fit around a slight curve if needed.
Cons: Requires several cuts along the perimeter. Bit more time consuming than other installation patterns.
Spanish Bond

In this design pattern, four outer bricks form a square that encases a half brick or square brick. Pros: Great for kitchen floors, entryways, sunrooms/mudrooms, back splashes. Cons: Cannot be adapted easily to fit over curves or uneven ground
Basket weave

In this installation pattern, pairs of bricks alternative vertically and horizontally to create a woven, almost tapestry-like appearance. Commonly used on flooring in entryways, sunrooms/mudrooms, and patios.
Pros: This pattern works well on straight paths, requiring infrequently cutting (only on the ends). If used on a perfectly rectangular area could require little to no cutting. It adds more visual attractiveness and character to a space.
Cons: Does not work as easily around curved or uneven surfaces.
Alternative - Diagonal Basket weave

Rotating the basket weave diagonally allows for even more visual depth. Looks great on flooring in entryways, hallways, sunrooms/mudrooms and patios.
Pros: Will round curves nicely
Cons: Requires a lot of custom cutting all around the perimeter of the space.
You can use most of these models for a fireplace.
Jack on jack, Stack or Straight Lay
The same as running bond except that tiles are fit squarely in neat rows instead of alternating in placement. This creates a basic, repeating grid. Another common pattern, especially for tiles in bathrooms, exterior surfaces, or kitchen backsplashes.
Choose the Right Thin Brick for Different Spaces
Consider Room Functionality

Different spaces benefit from specific brick patterns. Entryways, kitchens, and bathrooms each have unique requirements for durability, aesthetics, and ease of cleaning.
For example, a basket weave adds character to entryways, while a running bond layout may be optimal for high-traffic areas due to its strength.
Also, make sure to choose the right size of bricks.
Select Proper Colors and Textures for Improved Atmosphere
For a rustic, natural appeal, textured and earth-toned bricks can make a room feel grounded.
Step-by-Step Installation Guide for Beginners


This guide can address essential tools and techniques needed for each pattern type.
Preparation of the Surface: Describe surface preparation, such as ensuring the area is clean, level, and primed for adhesive application. Mention the importance of checking moisture levels for certain spaces, like bathrooms.
Choosing the Right Adhesive and Mortar: Detail the factors that affect adhesive choice, including tile weight, location, and exposure to moisture. Mortar selection may vary based on the type of tile used, and certain mortars can enhance the longevity of the installation in high-humidity areas.
Step-by-Step Layout Execution for Each Pattern: For each pattern mentioned (Running Bond, Herringbone, Basket Weave).
Laying the foundation
Ensuring even spacing
Cutting bricks to size
Finishing Touches: Explain how to apply grout and sealant, focusing on maintaining consistency in grout color and ensuring longevity. Adding a sealant can protect the grout, especially for exterior installations or areas prone to moisture.
Additional Brick Layout Patterns to Consider


Add descriptions of lesser-known yet visually unique patterns that readers may find appealing.
Chevron Pattern: Often confused with the herringbone, this pattern creates a continuous V-shaped design.
Flemish Bond: Combining full and half bricks, Flemish Bond creates a mixed grid that suits classic or historical interiors. It can bring a European feel to patios or fireplaces.
Cobblestone Layout: Although not a traditional brick pattern, this design can create a distinct, old-world look. Cobblestone patterns are especially effective in outdoor spaces, like walkways or patios.
The Bottom Line
Choosing the right tile pattern is essential to achieving the look and durability you want for your space. Each pattern brings its unique character and function, whether you aim for a classic layout or something with added visual depth.
With the right planning, materials, and attention to detail, your installation can transform any area into a long-lasting, beautifully crafted part of your home.
For additional information about our brick tile options, please visit our Thin Brick products page. Feel free to email us at design@realthinbrick or call our main line.